- Introduction to Computer Vision
- Image Preprocessing for Computer Vision
- Mathematical Analysis for Computer Vision
- A Complete Guide of Data Augmentation in Computer Vision
- Hands-on Image Classification in Computer Vision
- Face Recognition in Computer Vision with Implementation
- A Complete Guide to Object Detection with Implementation in Computer Vision
- A Comprehensive Guide to Image Segmentation in Computer Vision
- Pose Estimation in Computer Vision: Concepts & Implementation
- Optical Character Recognition (OCR) in Computer Vision: From Pixels to Text
- Image Generation with DCGANs in Computer Vision
- A Complete Guide to Image Restoration in Computer Vision
- 3D image generation in Computer Vision with implementation
Optical Character Recognition (OCR) in Computer Vision: From Pixels to Text | Computer Vision
Information surrounds us in printed documents, images, handwritten forms and many other ways. The ability to convert text from images and documents into machine readable format automatically is just awesome. The ability to extract valuable information from a photograph, a scanned book, a handwritten letter or others has been possible with the help of Optical Character Recognition(OCR) technology. In this article, we’ll embark on an exciting adventure, demystifying OCR step by step
Introduction. So, if you are ready to explore the secrets of OCR and discover how it’s transforming the way we interact with text, let’s embark on this enchanting journey and transform the pixels into words.
Before deep diving into the article, let’s know what we are going to explore in the whole article.
- Brief introduction of OCR
- Discuss about OCR techniques
- CRNN architecture
- Solve a real world OCR problem
- OCR challenges and applications
- Real world applications of OCR
- Conclusion and Further directions
Optical Character Recognition(OCR) is a technology that enables computers to recognize and convert text from printed documents, handwritten notes, or images into machine readable text. It enables computers to interpret and transform text from a diverse range of sources into a machine understandable format. It is a combination of image processing, pattern recognition, machine learning techniques to identify and extract characters, words, and textual content from various sources. The goal is to make textual information accessible and editable in digital form. This technology acts as a bridge between printed or handwritten text and the digital world that enables more efficient and accurate handling of textual information.
Significance of Optical Character Recognition (OCR)
This technology plays a vital role in various industries and applications. It offers numerous advantages that make it a valuable tool in today's digital age. Some of them are given below.
- It allows the conversion of printed and handwritten text from physical documents into digital format.
- It automates data entry tasks and reduces the need of manual data input that boosts efficiency, saves time and minimizes errors.
- It helps in document management and information retrieval.
- Modern OCR systems can recognize text in multiple languages that facilitates cross-cultural communication and global business operations.
- It helps in customer service processes automatically.
- It reduces the cost of manual data entry and enables organizations to analyze and extract insights from their textual information.
It has the ability to bridge the gap between physical and digital information, making text accessible, searchable and actionable. It empowers organisations and individuals to harness the value of textual data and leads to increased efficiency, productivity, and accessibility across various fields.
Optical Character Recognition (OCR) Techniques
There are so many techniques that have been developed to perform the OCR Technology efficiently. A number of optical character recognition open source libraries and OCR software have been developed to perform the tasks. Some cloud based solutions exist, and many deep learning models are developing day by day. Before deep learning, this technique has been applied with a more complicated process and also can’t perform well. So, we are not going to explore those methods. Let’s explore some OCR based popular libraries and cloud based solutions and then explore some deep learning models to handle these techniques.
- Tesseract: A highly configurable and open-source OCR engine supporting more than 100 languages. With the Pytesseract package, it can be seamlessly incorporated into Python and is often utilized in open-source optical character recognition projects.
- EasyOCR: A more recent OCR library, EasyOCR is compatible with more than 70 languages. Because of its reputation for accuracy and usability, OCR software projects frequently choose to employ it.
- Google Cloud Vision: This cloud-based program has strong optical character recognition (OCR) capabilities and can accurately identify text in photos. With sophisticated features like handwriting recognition and language detection, it's the go-to tool for optical character recognition Google projects.
CRNN Architecture
Convolutional Recurrent Neural Network is a deep learning architecture that combines both CNN and RNN. It combines 3 parts such as Convolutional layers, recurrent layers, transcription layers. Convolutional layers are used to extract the feature maps of the image. Recurrent layers are responsible for handling sequence and context that is essential for recognizing characters in the correct order and considering contextual information. Transcription layer translates the predictions into the final label sequence.
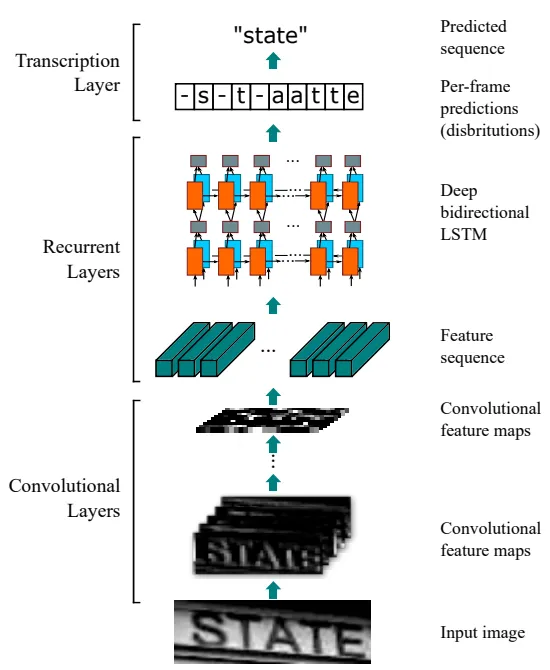
CRNN plays a vital role in the field of OCR in Python and text recognition that can handle complex fonts, language and styles. It can also consider the spatial and sequential aspects of text that performs automated text recognition in images more accurately and efficiently.
Problem Domain
A very common problem of Optical Character Recognition (OCR) is to extract text from CAPTCHA images. Today we will build a deep learning model to extract text from the CAPTCHA images and this method gives you an overall idea to solve any complex problem in OCR technology. The dataset of the CAPTCHA image is here. The images contain 5 letters that can also be numbers. Let’s get started.
Start implementation
We will solve the problem with the pytorch library. You will get the full project code on Google Colab. So, first import the necessary libraries for complete the task where numpy, pandas, matplotlib, os, glob, opencv, sklearn libraries are for data manipulation, preprocessing and visualization. Torch and torchvision are used for data preprocessing and model creation. Multiprocessing is a module for parallel and concurrent programming.
import os
import glob
import numpy as np
import pandas as pd
import matplotlib.pyplot as plt
import torch
import torch.nn as nn
import torch.nn.functional as F
import torch.optim as optim
from torch.utils.data import Dataset, DataLoader
from torchvision import transforms
from torchvision.models import resnet18
import string
from tqdm.notebook import tqdm
import cv2
from PIL import Image
from sklearn.model_selection import train_test_split
from sklearn.metrics import accuracy_score
import multiprocessing as mp
# return available cpu cores on your computer
cpu_count = mp.cpu_count()
print(cpu_count)
16
Give the image data path and see how many images are in the directory. Then see how many letters in an image. We get 1070 images in the directory and each image contains 5 words.
data_path = "Path of the images"
image_fns = os.listdir(data_path)
print(len(image_fns))
print(np.unique([len(image_fn.split(".")[0]) for image_fn in image_fns]))
1070
[5]
Check that any image contains more or less than 5 letters. If so, remove those images because it may affect the post processing.
for idx, image_fn inenumerate(image_fns):
    iflen(image_fn.split(".")[0]) != 5:
           print(idx, image_fn)
Split the images into training and testing images. Then see how many unique letters are there and which letters exist.
image_fns_train, image_fns_test = train_test_split(image_fns, random_state=0)
print(len(image_fns_train), len(image_fns_test))
# take the labels of the images
image_ns = [image_fn.split(".")[0] for image_fn in image_fns]
# join all the letters
image_ns = "".join(image_ns)
# exclude the unique letters
letters = sorted(list(set(list(image_ns))))
print(len(letters))
print(letters)
802 268
19
['2', '3', '4', '5', '6', '7', '8', 'b', 'c', 'd', 'e', 'f', 'g', 'm', 'n', 'p', 'w', 'x', 'y']
Now include hyphens to the letters that represent a blank character or separator. ‘Idx2char’ variable indicates a dictionary where keys are integer indices and values are the corresponding characters. ‘Char2idx’ is another dictionary that is a reverse mapping of ‘idx2char’ variable.
vocabulary = ["-"] + letters
print(len(vocabulary))
print(vocabulary)
idx2char = {k:v for k,v inenumerate(vocabulary, start=0)}
print(idx2char)
char2idx = {v:k for k,v in idx2char.items()}
print(char2idx)
20
['-', '2', '3', '4', '5', '6', '7', '8', 'b', 'c', 'd', 'e', 'f', 'g', 'm', 'n', 'p', 'w', 'x', 'y']
{0: '-', 1: '2', 2: '3', 3: '4', 4: '5', 5: '6', 6: '7', 7: '8', 8: 'b', 9: 'c', 10: 'd', 11: 'e', 12: 'f', 13: 'g', 14: 'm', 15: 'n', 16: 'p', 17: 'w', 18: 'x', 19: 'y'}
{'-': 0, '2': 1, '3': 2, '4': 3, '5': 4, '6': 5, '7': 6, '8': 7, 'b': 8, 'c': 9, 'd': 10, 'e': 11, 'f': 12, 'g': 13, 'm': 14, 'n': 15, 'p': 16, 'w': 17, 'x': 18, 'y': 19}
Create custom Dataset
CAPTCHADataset is a custom dataset class that is designed to load and preprocess CAPTCHA images. Here the len function returns the total number of images in the dataset. Getitem function is responsible for retrieving a specific data point from the dataset at a given index. Transform method is used for converting the image into tensor and normalizing the data.
batch_size = 16
classCAPTCHADataset(Dataset):

    def__init__(self, data_dir, image_fns):
        self.data_dir = data_dir
        self.image_fns = image_fns

    def__len__(self):
        returnlen(self.image_fns)

    def__getitem__(self, index):
        image_fn = self.image_fns[index]
        image_fp = os.path.join(self.data_dir, image_fn)
        image = Image.open(image_fp).convert('RGB')
        image = self.transform(image)
        text = image_fn.split(".")[0]
        return image, text

    deftransform(self, image):

        transform_ops = transforms.Compose([
            transforms.ToTensor(),
            transforms.Normalize(mean=(0.485, 0.456, 0.406), std=(0.229, 0.224, 0.225))
        ])
        return transform_ops(image)
Now create training and testing dataset, then create data loaders for training and testing that are used to efficiently load and iterate through the dataset during training and testing. Then see the number of data loaders and size of each image batch and also the text of the images.
trainset = CAPTCHADataset(data_path, image_fns_train)
testset = CAPTCHADataset(data_path, image_fns_test)
train_loader = DataLoader(trainset, batch_size=batch_size, num_workers=cpu_count, shuffle=True)
test_loader = DataLoader(testset, batch_size=batch_size, num_workers=cpu_count, shuffle=False)
print(len(train_loader), len(test_loader))
image_batch, text_batch = iter(train_loader).__next__()
print(image_batch.size(), text_batch)
Output
51 17 torch.Size([16, 3, 50, 200])
('dd5w5', 'feyc8', 'f753f', 'gcx6f', 'ewnx8', 'xgcxy', 'c4bgd', 'pcm7f', '3dgmf', '7wyp4', 'nfndw', 'wye85', 'wdww8', 'mc35n', 'x6b5m', '6b4w6')
Define the num_chars, rnn_hidden_size and device(CPU/GPU) for the further works.
num_chars = len(char2idx)
print(num_chars)
rnn_hidden_size = 256
device = torch.device('cuda'if torch.cuda.is_available() else'cpu')
print(device)
20
Cuda
Define the resnet18 model for use in the CRNN model in the CNN section.
resnet = resnet18(pretrained=True)
#print(resnet)
Create CRNN model
CRNN model is a combination of CNN and RNN that is used to recognize and transcribe text from images. The model is designed to take an input batch of images and produce an output sequence of characters. Here the CNN part 1 takes a pretrained resnet model excluding last 3 layers to extract high level features of the images. CNN part 2 takes a convolutional layer with batch normalization that is used to further process the feature maps of CNN part 1. Then the Linear layer is used to reduce the number of features. Then two bidirectional GRU layers (rnn1, rnn2) are used for sequence modeling that capture sequential information in both directions(forward and backward). Then define the model through forward function.
classCRNN(nn.Module):

    def__init__(self, num_chars, rnn_hidden_size=256, dropout=0.1):

        super(CRNN, self).__init__()
        self.num_chars = num_chars  #represents the character classes
  # size of hidden state in bidirectional GRU layers
        self.rnn_hidden_size = rnn_hidden_size
        self.dropout = dropout     # dropout rate

        # CNN Part 1
        resnet_modules = list(resnet.children())[:-3]
        self.cnn_p1 = nn.Sequential(*resnet_modules)

        # CNN Part 2
        self.cnn_p2 = nn.Sequential(
            nn.Conv2d(256, 256, kernel_size=(3,6), stride=1, padding=1),
            nn.BatchNorm2d(256),
            nn.ReLU(inplace=True)
        )
        self.linear1 = nn.Linear(1024, 256)

        # RNN
        self.rnn1 = nn.GRU(input_size=rnn_hidden_size,
                            hidden_size=rnn_hidden_size,
                            bidirectional=True,
                            batch_first=True)
        self.rnn2 = nn.GRU(input_size=rnn_hidden_size,
                            hidden_size=rnn_hidden_size,
                            bidirectional=True,
                            batch_first=True)
        self.linear2 = nn.Linear(self.rnn_hidden_size*2, num_chars)

    defforward(self, batch):

        batch = self.cnn_p1(batch)
        # print(batch.size()) # torch.Size([-1, 256, 4, 13])

        batch = self.cnn_p2(batch) # [batch_size, channels, height, width]
        # print(batch.size())# torch.Size([-1, 256, 4, 10])

        batch = batch.permute(0, 3, 1, 2) # [batch_size, width, channels, height]
        # print(batch.size()) # torch.Size([-1, 10, 256, 4])

        batch_size = batch.size(0)
        T = batch.size(1)
        batch = batch.view(batch_size, T, -1) # [batch_size, T==width, num_features==channels*height]
        # print(batch.size()) # torch.Size([-1, 10, 1024])

        batch = self.linear1(batch)
        # print(batch.size()) # torch.Size([-1, 10, 256])

        batch, hidden = self.rnn1(batch)
        feature_size = batch.size(2)
        batch = batch[:, :, :feature_size//2] + batch[:, :, feature_size//2:]
        # print(batch.size()) # torch.Size([-1, 10, 256])
        batch, hidden = self.rnn2(batch)
        # print(batch.size()) # torch.Size([-1, 10, 512])

        batch = self.linear2(batch)
        # print(batch.size()) # torch.Size([-1, 10, 20])

        batch = batch.permute(1, 0, 2) # [T==10, batch_size, num_classes==num_features]
        # print(batch.size()) # torch.Size([10, -1, 20])

        return batch
The code initializes the weights and biases of neural network layers. For linear and convolutional layers, weights are initialized with Xavier initialization. For the batch normalization layer, the weights are normal distribution.
defweights_init(m):
    classname = m.__class__.__name__
    iftype(m) in [nn.Linear, nn.Conv2d, nn.Conv1d]:
        torch.nn.init.xavier_uniform_(m.weight)
        if m.bias isnotNone:
            m.bias.data.fill_(0.01)
    elif classname.find('BatchNorm') != -1:
        m.weight.data.normal_(1.0, 0.02)
        m.bias.data.fill_(0)
Before training data, make predictions through the model with the image_batch in text_batch_logits where text_batch is the ground truth text batch. Then define the CTCLoss function for the model.
CTCLoss stands for Connectionist Temporal Classification Loss that is used to sequence to sequence tasks. It aims to find the alignment that maximizes the likelihood of the target sequence given the input sequence. ‘Blank’ label is introduced to represent gaps or repeated characters in the target sequence. The loss encourages the model to produce the correct characters while accounting for variations in alignment. It computes a differentiable loss function that guides to produce accurate transcriptions.
crnn = CRNN(num_chars, rnn_hidden_size=rnn_hidden_size)
crnn.apply(weights_init)
crnn = crnn.to(device)
text_batch_logits = crnn(image_batch.to(device))
print(text_batch)
print(text_batch_logits.shape)
criterion = nn.CTCLoss(blank=0)
('dd5w5', 'feyc8', 'f753f', 'gcx6f', 'ewnx8', 'xgcxy', 'c4bgd', 'pcm7f', '3dgmf', '7wyp4', 'nfndw', 'wye85', 'wdww8', 'mc35n', 'x6b5m', '6b4w6') torch.Size([10, 16, 20])
The function ‘encode_text_batch’ is used to encode a batch of text labels into a format that can be used for computing the CTCLoss.
defencode_text_batch(text_batch):
    # len of each text label in the batch
    text_batch_targets_lens = [len(text) for text in text_batch]
    # convert the text label length into tensor data type
    text_batch_targets_lens = torch.IntTensor(text_batch_targets_lens)
    # concatenate all the text labels into a single string
    text_batch_concat = "".join(text_batch)
    # take corresponding integer index using ‘char2idx’ dictionary
    text_batch_targets = [char2idx[c] for c in text_batch_concat]
    # convert the list integers into tensor integer
    text_batch_targets = torch.IntTensor(text_batch_targets)

    return text_batch_targets, text_batch_targets_lens
The function ‘compute_loss’ is responsible for computing the CTCLoss for a batch of text labels and the corresponding model predictions.
defcompute_loss(text_batch, text_batch_logits):
    """
    text_batch: list of strings of length equal to batch size
    text_batch_logits: Tensor of size([T, batch_size, num_classes])
    """
    text_batch_logps = F.log_softmax(text_batch_logits, 2) # [T, batch_size, num_classes]
    text_batch_logps_lens = torch.full(size=(text_batch_logps.size(1),),
                                       fill_value=text_batch_logps.size(0),
                                       dtype=torch.int32).to(device) # [batch_size]
    #print(text_batch_logps.shape)
    #print(text_batch_logps_lens)
    text_batch_targets, text_batch_targets_lens = encode_text_batch(text_batch)
    #print(text_batch_targets)
    #print(text_batch_targets_lens)
    loss = criterion(text_batch_logps, text_batch_targets, text_batch_logps_lens, text_batch_targets_lens)
    return loss
Defines some parameters for training a CRNN model. It prepares the model, optimizer, learning rate scheduler and training parameters for training the Optical Character Recognition (OCR) model over a specified number of epochs. Create an instance of the CRNN model, apply the weights to the model and move the model to a specific computing device.
num_epochs = 50
lr = 0.001# learning rate for optimizer
# regularization that adds a penalty to the loss function
weight_decay = 1e-3
clip_norm = 5 # prevent exploding gradients during training
optimizer = optim.Adam(crnn.parameters(), lr=lr, weight_decay=weight_decay)
# Monitor a specific metric (validation loss) and reduce the learning rate # when the metric stops improving.
lr_scheduler = optim.lr_scheduler.ReduceLROnPlateau(optimizer, verbose=True, patience=5)
crnn = CRNN(num_chars, rnn_hidden_size=rnn_hidden_size)
crnn.apply(weights_init)
crnn = crnn.to(device)
The following code is used to train the Optical Character Recognition (OCR) model over a specified number of epochs, tracking the loss values at each iteration and epoch. The learning rate may be adjusted during training to improve convergence. The loss values and other statistics are stored for analysis and visualization.
epoch_losses = []
iteration_losses = []
num_updates_epochs = []
for epoch in tqdm(range(1, num_epochs+1)):
    epoch_loss_list = []
    num_updates_epoch = 0
    for image_batch, text_batch in tqdm(train_loader, leave=False):
  # reset the gradients of the optimizer before each iteration
        optimizer.zero_grad()
  # pass the image batch to CRNN model
        text_batch_logits = crnn(image_batch.to(device))
  # compute loss
        loss = compute_loss(text_batch, text_batch_logits)
        iteration_loss = loss.item()
        if np.isnan(iteration_loss) or np.isinf(iteration_loss):
            continue

        num_updates_epoch += 1
        iteration_losses.append(iteration_loss)
        epoch_loss_list.append(iteration_loss)
  # backpropagation to compute gradients and
        loss.backward()
  # clip the gradients to prevent exploding gradients
        nn.utils.clip_grad_norm_(crnn.parameters(), clip_norm)
  # update model parameters
        optimizer.step()
    epoch_loss = np.mean(epoch_loss_list)
    print("Epoch:{}    Loss:{}    NumUpdates:{}".format(epoch, epoch_loss, num_updates_epoch))
    epoch_losses.append(epoch_loss)
    num_updates_epochs.append(num_updates_epoch)
    lr_scheduler.step(epoch_loss)
Epoch:1 Loss:3.008742103389665 NumUpdates:51
Epoch:2 Loss:2.382991430806179 NumUpdates:51
—--------------------------------------------------------------
—---------------------------------------------------------------
Epoch:49 Loss:0.5063658718969307 NumUpdates:51
Epoch:50 Loss:0.5039532692993388 NumUpdates:51
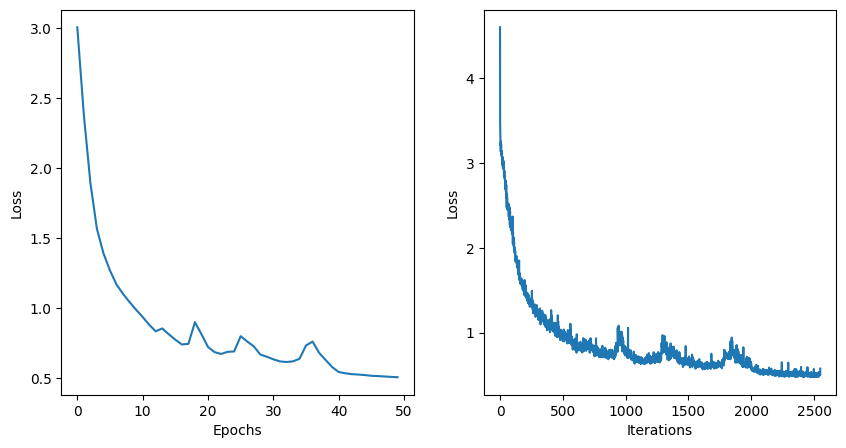
See the losses per epochs and iterations.
fig, (ax1, ax2) = plt.subplots(1, 2, figsize=(10, 5))
ax1.plot(epoch_losses)
ax1.set_xlabel("Epochs")
ax1.set_ylabel("Loss")
ax2.plot(iteration_losses)
ax2.set_xlabel("Iterations")
ax2.set_ylabel("Loss")
plt.show()
The function ‘decode_predictions’ takes the prediction of the model and converts it into human readable text.
defdecode_predictions(text_batch_logits):
    # calculates the most likely character for each position in sequence
    text_batch_tokens = F.softmax(text_batch_logits, 2).argmax(2) # [T, batch_size]
    text_batch_tokens = text_batch_tokens.numpy().T # [batch_size, T]
    text_batch_tokens_new = []
    for text_tokens in text_batch_tokens:
        text = [idx2char[idx] for idx in text_tokens]
        text = "".join(text)
        text_batch_tokens_new.append(text)
    return text_batch_tokens_new
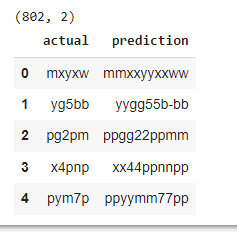
The following code is used to evaluate the trained model on the training dataset and collect the actual and prediction text of images in a dataset called results_train. Then see the output of the dataframe.
results_train = pd.DataFrame(columns=['actual', 'prediction'])
train_loader = DataLoader(trainset, batch_size=16, num_workers=1, shuffle=False)
with torch.no_grad():
    for image_batch, text_batch in tqdm(train_loader, leave=True):
        text_batch_logits = crnn(image_batch.to(device)) # [T, batch_size, num_classes==num_features]
        text_batch_pred = decode_predictions(text_batch_logits.cpu())
        #print(text_batch, text_batch_pred)
        df = pd.DataFrame(columns=['actual', 'prediction'])
        df['actual'] = text_batch
        df['prediction'] = text_batch_pred
        results_train = pd.concat([results_train, df])
results_train = results_train.reset_index(drop=True)
print(results_train.shape)
results_train.head()
The following code is used to evaluate the trained model on the testing dataset and collect the actual and prediction text of images in a dataset called results_test. Then see the output of the dataframe.
results_test = pd.DataFrame(columns=['actual', 'prediction'])
test_loader = DataLoader(testset, batch_size=16, num_workers=1, shuffle=False)
with torch.no_grad():
    for image_batch, text_batch in tqdm(test_loader, leave=True):
        text_batch_logits = crnn(image_batch.to(device)) # [T, batch_size, num_classes==num_features]
        text_batch_pred = decode_predictions(text_batch_logits.cpu())
        #print(text_batch, text_batch_pred)
        df = pd.DataFrame(columns=['actual', 'prediction'])
        df['actual'] = text_batch
        df['prediction'] = text_batch_pred
        results_test = pd.concat([results_test, df])
results_test = results_test.reset_index(drop=True)
print(results_test.shape)
results_test.head()
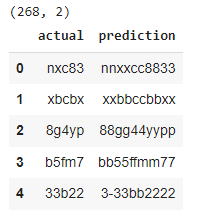
The function ‘remove_duplicates’ is designed to remove the consecutive duplicate characters from a given text. You notice that there are many duplicate values in the train and test data prediction. So, This function is used to eliminate repeated characters in a text, making it more concise.
defremove_duplicates(text):
    iflen(text) > 1:
        letters = [text[0]] + [letter for idx, letter inenumerate(text[1:], start=1) if text[idx] != text[idx-1]]
    eliflen(text) == 1:
        letters = [text[0]]
    else:
        return""
    return"".join(letters)
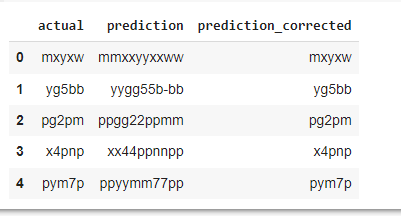
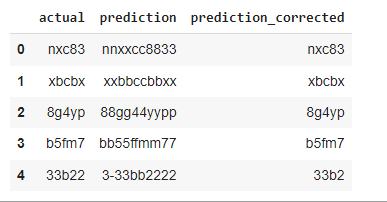
The function takes a predicted text and tries to correct the word by removing consecutive duplicate characters within each part. Then see the correct prediction of the model for train dataset and test dataset.
defcorrect_prediction(word):
    parts = word.split("-")
    parts = [remove_duplicates(part) for part in parts]
    corrected_word = "".join(parts)
    return corrected_word
results_train['prediction_corrected'] = results_train['prediction'].apply(correct_prediction)
results_train.head()
results_test['prediction_corrected'] =
results_test['prediction'].apply(correct_prediction)
results_test.head()
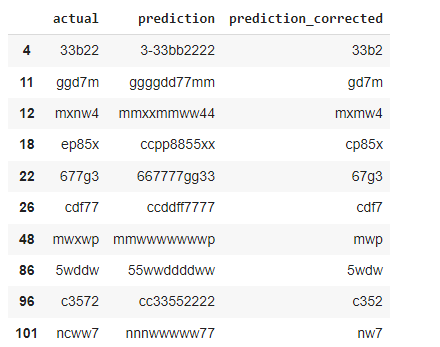
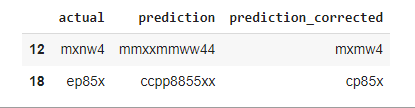
See the predicted values that can not perform as actual values means misprediction of the model.
mistakes_df = results_test[results_test['actual'] !=
results_test['prediction_corrected']]
mistakes_df
The mistakes_df mostly contain 4 words for 34 times and 5 words for only 2 times. Let’s also see the mispredicted values which predict 5 words.
print(mistakes_df['prediction_corrected'].str.len().value_counts())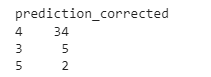
mask = mistakes_df['prediction_corrected'].str.len() == 5
mistakes_df[mask]
See the image and corresponding prediction output for the image which can predict accurately.
mistake_image_fp = os.path.join(data_path, mistakes_df[mask]['actual'].values[0] + ".png")
print(mistake_image_fp)
mistake_image = Image.open(mistake_image_fp)
plt.imshow(mistake_image)
plt.show()
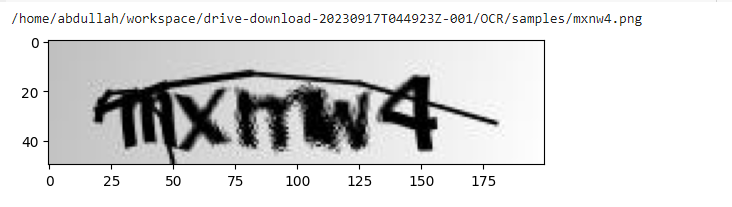
Cool. We have perfectly created a model that performs the Optical Character Recognition system well enough. We haven’t performed any evaluation metrics to measure accuracy of our pretrained model but hope you will do that.
Evaluation Metrics for Optical Character Recognition (OCR)
It is used to measure the accuracy and performance of the model. There are some common evaluation metrics of OCR discussed below.
- Character accuracy: It measures the percentage of the correctly recognized characters in the entire document. It provides a basic understanding of how well the OCR model performs in terms of individual character recognition.
- Word accuracy: It measures the percentage of correctly recognized words in a document that provides a more practical evaluation of OCR.
- Edit Distance (Levenshtein Distance): It measures the number of single character edits required to transform the recognized text into the ground truth text.It is a valuable metric of OCR that measures how close the recognized text is to the expected text.
These are the common metrics but there are many others like Confusion Matrix, Precision and Recall, F1 Score, Mean Average Precision, Intersection over Union, Word Error Rate, Character Error Rate and so on. Although the choice of the evaluation metrics depends on the specific OCR task and the goals of the evaluation.
Optical Character Recognition (OCR) Challenges and Limitations
While using OCR technology, you may be bored of getting inaccurate results. It happens because of some challenges and limitations of this technology. Let’s get some items out.
- Recognition of handwritten text is more challenging than printed text due to variations of handwriting styles and inconsistencies between individual writers.
- The bad quality of the image(poor lighting, low resolution, image artifacts, or background noise) can lead to recognition errors.
- OCR systems may struggle with recognizing complex fonts and styles.
- Handling multiple languages and scripts within a single document can be challenging.
- It may be predicted with spelling errors.
- Recognizing special characters, mathematical notations, or symbols can be problematic.
You may face any other challenges at the time of working with Optical Character Recognition (OCR) technology. To overcome the above problems, you may take high quality images with good lighting and resolution, try some preprocessing techniques such as noise removal, background removal and others, research about OCR engines that help you to choose the perfect one, use hybrid or ensemble model, latest research model to improve accuracy, try to augment the before training that robust the model performance, implement post processing techniques such as spell checking, error correction, and contextual analysis and others. Overall, Experiment and iteration are key to improving OCR accuracy over time.
Real-World Optical Character Recognition (OCR) Applications
It is widely used in various real-world applications across different industries. Some of them are given below.
- Healthcare: OCR technology is used for digitizing patient records, medical prescriptions, and insurance claims. It simplifies medical billing and extracting information from medical reports.
- Banking and Finance: It automatically performs check processing, recognizing accounts and amounts, invoice processing, receipt scanning, expense management and many other works.
- Document Digitization: It is used to digitize paper documents, books, and historical records. It converts printed or handwritten text into machine readable content that is valuable for libraries, archives looking to preserve and access historical documents.
- Data Entry and Forms Processing: It automates data entry tasks by extracting information from paper forms, surveys, and questionnaires.
- Legal Industry: Law firms use OCR technology to convert legal documents and contracts into electronic text.
Optical Character Recognition (OCR) has limitless applications such as Automating text translation from image, usage in retail and inventory management, number plate recognition, valuable text recognition from images and videos, converting printed educational material into digital forms. Nowadays, many industries use OCR to automate image to text conversion. Automating the extraction of data from invoices and receipts, passport and ID scanning and many others.
Conclusion and Future Trends
We have discussed the inner workings of OCR, exploring the techniques, libraries, and cloud based solutions that enable the conversation of text from images and documents. Then we make a deep learning model to handle captcha related problems. After we have discussed challenges and real world applications of OCR. Hope, this will give an overall idea about OCR.
For Future works and advancements, we can work to improve the model accuracy, adaptation of OCR technology with multilingual and multi script support, real time processing, OCR for less common languages, integration with mobile or web applications, accessible to individuals, data security and privacy and many others. Stay tuned with the current research and improve day by day. Happy Learning!!!!